Sunday, April 29, 2007

Another post card is created

I have been working on my postcards lately as I needed a change from making my web site (which is going pretty well so far - I am using Adobe Illustrator CS to create the template) I have settled on one but still think it need something, fortunately I have saved it in the .AI file format so it will be easy to change. I tried to recreate the static effect on a T.V that had been unplugged (had no signal - more commonly referred to as snow and those annoying lines that come up when the signal is bad) using a number of filters at my disposal (The film grain filter was most crucial) I wrote the text 'Good T.V is the way forward' (something I hear students say a lot - henceforth my target audience) and the 'Snow' on the background to emphasis the E4 (the only coloured item) channel would not have this problem as it was clear and crisp (thanks vector images) The text was a sort of western style which would emphasis entertainment (it is the most recognizable and to me personally dull movies out there which backs up the background, thats why I chose this text) - I also put the E4 symbol in a spotlight which attracts the readers attention. Take a look.
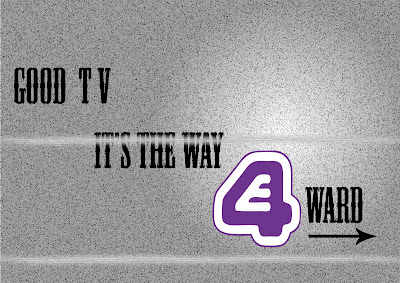
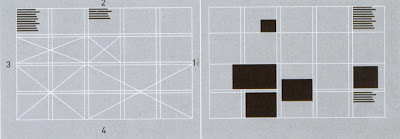
I ran through a few of these following some simple layout rules which I gained from a certain book.

-Letterhead and Logo design (top design studio, Los Angeles). 2003, Massachusetts, untied states of America : Rockport publishers,Inc.- <--- notice the Harvard reference. Here are the layout design I used - remeber to click on the images to get a better view.



If you would like to comment on this design please do, just remember there is a limited time before the hand in date is quite soon so please comment soon. thanks a mil in advance.


I
have done another one as some feedback stated that the positioning of the text could have been better. This is another style I took from the same examples I used to create the previous one. it still uses the same technique of guiding the eye downwards - like steps. but has a lot more harsher decent. it leaves the same amount of space open as the previous one did on the sides but at slightly less curved angles. I will be submitting both in my final folder.
Evaluating own work


Evaluating own work requires the user to pinpoint specific areas of the project, mostly in the following order – Idea, Research, Post production, Production. Research is the most crucial stage… for example what materials can be use, what techniques and if the software and hardware will support the creation of your final production. Jumping ahead a little, it is a good idea to write appendices at the end of your article and reference this information at certain points in your evaluation… For instance, when writing something about a technical error you ran into which has already been covered in an online journal, it is wise to copy and paste that text into the appendices and write a quick reference point during your evaluation pointing to it e.g. I ran into problems whilst using Dreamweaver but soon solved the problem (see appendix, 3)

Most of the time when writing a report (especially for lecturers) it is important to note that they will not be too interested in the programs and process you created the final product with, they will be more interested in why you chose to use those programs, why you used certain methods to create the product and most importantly what influences and materials inspired you to create the final piece of work – just saying you created a post card and the reason you decided it was finished was ‘because it looked good’ will not be looked upon too favourably.


I have also dug up the link for those that wish to 'Harvard reference' -

http://libweb.anglia.ac.uk/referencing/harvard.htm

Friday, April 27, 2007

3D Max text animation test


Here we have a quick text animation test I did in 3D max, unfortunately I did not attend the first 3D animation lecture because I was confused by the ever changing timetable (In fact I was looking at three different ones!)Fortunately one of my colleges gave me a copy of the notes that where used in the lecture (Thank you Sid) and I created this animation from following the instructions. I attempted to create shadows on a Solid object directly below the text but it was not successful - I will attempt this again in the future. I probably would have been able to figure it out with the use of the 3D max help files but my computer was playing up and did not allow me to access this resource... I guess I will be taking out the book in the library soon.


Here it is.

Monday, April 23, 2007

Heartless Henry E4 Sting


Well I've completed my E4 Sting called Heartless Henry and have finally decided to put it up on my blog.
I have already mentioned how I animated my character in articles below so I shall not repeat the process, What I will mention here is how I created the background. Firstly, what better way to start than with a short movie clip - enjoy kiddies.


I Wanted to created a background that the Heartless Henry character could believably exist in, I knew I was going to have to stick to the colour scheme I initially started with (Gray scale - pencil drawing) as my character would look out of place in a nice, Millions of colours, Fully textured background. I also created the character with the intent to be standing in a 3D background as his feet positioning will give away - It also had to be surreal as my character was too. I built the set above using Google sketchup and tried to make it look habitable yet and extremely strange place to want to live, Initially I was just going to leave it as blank walls with shadows and maybe a few Photoshop effects but then I came across some very nice sketch textures which fitted perfectly. I then decided it would be a worthy idea to try different techniques in Photoshop anyways and see if I
could create a different ambience, I was truly considering adding fog but it didnt work in the end, here are a few examples of angles and filters I tried - apart from the last one titled White block.JPG which was used to create the fade out effect in my final production. - PLEASE CLICK ON THE IMAGE TO MAKE IT BIGGER AND GET A BETTER VIEW.

After playing around with the character on these backgrounds I came to the conclusion that I would not have to add any effect to the background as it suited quite nicely (less can be more sometimes)

I then put the character into Adobe After effects (or should I say put the background behind my completed character) and BAM! it worked very well. The problem I had next was that Adobe After effects did not have the ability to do real time sound editing so I would have to make a sound, put it in and then render the whole damn thing as an AVI file before I could see it. This was unacceptable as sound editing required exact timing and even 0.2 of a second can make one hell of a big difference. I came up with a quick solution for this... Render the animation with the background to a PAL/AV format and then import it into Adobe Premier - I then proceeded to add the sounds in there and it worked fine. The only problem I ran into again was when I tried to 'Export' the new file using the DIVX compressor (It was reccomended by the Youtube Website to obtain best results on their systems ) I got lots of 'Artifacts' -> (which are blobs, irregularities and distortion on the clip) . I suspect it was due to the fact that my animation was rendered at 30 FPS and I was compressing it at 25 FPS again. I didnt bother trying to prove this theory and just exported it as a PAL File again with no compression as it turned out to be a relatively decent sized file anyways.

Here it is (not in it's full glory as the Youtube compressor Screwed the quality up just a little and made it more blurry but it is still acceptable) - I will try to upload it to www.Motiono.com at a later date though, this site offers better quality and faster uploads, another thing is it does not feature as much spam as Youtube either in my humble opinion.


And there you have it, Heartless Henry is born.


Photoshopping photo's


I was just looking around Youtube and found something quite interesting, it was a short movie clip about retouching photo's in Photoshop. I'll just pop it here for people to have a look at. One thing I like alot about this one was how he ( Rodrigo) adjusted the eyes to make them stand out more, it makes such a big difference. I think the Kid at the end of the clip looks a bit creepy afterwards though as the picture is darkened more and the colours made more bland, Still a nice technique though and the music compliments it well.


Here's another one I dug up too, it shows everything in more detail but can be quite lengthy to watch and only shows the techniques briefly but it's still quite impressive, this one shows how the Pro's do it - lots of messing around but the result is excellent - Makes you want to grab one of those horribly taken photos of yourself out of the drawer and do some magic. Gotta love Photoshop.

Tuesday, April 10, 2007


Heartless Henry

I Have been creating a Pencil/Photoshop manipulated set of images over the holiday, I have then imported these images into a program called 'Adobe After Effect 6.5' to animate it - I found it to be a worthy program but probably could have done it quicker using something else, I am creating the background in 'Google sketchup' and the custom sounds will be produced with 'Fruity loops XXL'. I also noticed later on in the process of creating this animation that After effects does not really support live sound which was not really a surprise as I ran into many other problems - mainly with my computers resource settings, nothing like a bit of technical chaos to keep you on the edge. I therefore now have to import the final heartless henry animation into 'Adobe premier Pro' and do the live sound editing there, it should be a piece of cake when I get to that point. I will be posting a link soon with the finished product.